Documentation
Safrove User Guide
This guide follows the four tabs in the Windows client and explains how to complete the initial setup, verify backup status, search and open historical files, and mount snapshots as read-only drives.
Quick Start

First-time setup
1. Set Location (the backup repository)
Location identifies the backup repository that stores all historical backups. The repository contains encrypted data blobs, snapshot records, indexes, and configuration. If it is damaged or lost, historical versions may no longer be readable, mountable, or recoverable.
- Prefer a dedicated disk, external drive, or a folder with ample capacity. Do not use a temporary system directory.
- Available capacity should at least cover the current total size of all source folders. As a starting estimate, reserve 1.5 to 2 times that amount; frequent changes and longer retention require more space.
- Safrove automatically excludes the repository during backup to prevent recursive backup. Keeping it outside all source folders is still recommended.
2. Set the Encryption Password
The password cannot be recovered or bypassed. This password decrypts the entire repository. An existing repository must be opened with the password used when it was created. If that password is lost, Safrove cannot read, mount, or restore the data. Store it securely in a password manager or another trusted location.
3. Add or remove folders to back up
- Add: Select the blank row at the bottom of the table and click the “...” shown on its right to choose a folder. You can also double-click the blank row and enter a full path.
- Edit: Double-click an existing path to edit it, or select the row and use the “...” action to choose another folder.
- Delete: Right-click the row and choose Delete. This removes the folder from the backup configuration; it does not delete the original files from disk.
- Repository exclusion: If a source folder overlaps the repository, Safrove excludes the repository before each backup. A source folder located inside the repository is not backed up.
4. Choose Backup Frequency
This dropdown controls the automatic backup interval: Manual, Every 1/2/4/8/12 hours, or Daily.
- Manual: no automatic snapshots; back up only by clicking Backup Now on Status.
- Every N hours / Daily: triggers a backup and creates a snapshot at the configured interval. Duplicate data blobs are deduplicated and do not consume the same amount of space again.
- Use 1 to 4 hours for actively edited work. Use 8 or 12 hours, or Daily, for larger or less frequently changed data.
5. Choose Prune (retention policy)
Prune controls which historical snapshots are retained. All retention rules are evaluated together, and one snapshot may satisfy the recent, daily, and weekly rules at the same time, so their counts are not additive.
Keep 3 recent, 1 daily, 1 weekly, 1 monthly, and 1 yearly snapshot. Best when repository capacity is limited.
Keep 10 recent, 7 daily, 4 weekly, 12 monthly, and 2 yearly snapshots. Suitable for most users.
Keep 30 recent, 14 daily, 8 weekly, 24 monthly, and 5 yearly snapshots. Preserves more history and requires more space.
With hourly backups, the 10 recent snapshots cover about 10 hours. Older history then keeps one representative snapshot per day for 7 days, per week for 4 weeks, per month for 12 months, and per year for 2 years.
6. Save and complete the first backup
- Choose whether to start with Windows, then click Save. After the completion message, open Status and click Backup Now.
- Wait for completion, then verify that Last backup, Snapshots, Files, and the task log have updated.
License & Activation
Safrove uses an offline license.lic file bound to the current Machine ID. The license term controls repository write access; after a valid license expires normally, existing backups remain available in read-only mode.
| Before expiration | After expiration |
|---|---|
| Full read/write access | Read-only access |
|
|
Obtain and import a license file
- Open License... from the tray menu and confirm the Machine ID. Buy Now opens safrove.com/buy with the current machine ID prefilled.
- Trial: choose 14-Day Trial, enter your email, accept the agreement, generate the license, and download license.lic.
- Purchase: when paid licensing is available, choose the one-time edition on the same page, complete payment, and download the license.lic issued for that Machine ID.
- Return to License, click Import License..., and select the file. Safrove copies and verifies it immediately; it is active when the dialog shows Activated.
Troubleshooting steps
- Open License... to check the license status and expiration date.
- Verify that license.lic in the program directory is the license file for the current machine.
- If a machine ID mismatch is reported, re-activate using the current machine code.
Backup Settings
Settings combines the repository location, encryption password, source folders, backup schedule, retention policy, and maintenance actions on one page.
Repository and Password
Location— The repository path where snapshots, indexes, and data blobs are stored.Encryption Password— Encryption Password — the repository encryption password. If lost, historical backups cannot be read. Keep it safe.Save— Click Save to validate the repository password and store all settings. A completion message confirms success.
Select folders to back up
Each row in the table represents a source folder to back up. You can add multiple folders; if a source overlaps the repository, Safrove automatically excludes the repository during backup.
Backup Frequency and Retention
Backup Frequency controls the automatic backup interval. Prune selects the snapshot retention policy, with the exact retention counts shown beside the dropdown.
Maintenance
Run Check performs a quick metadata and index check, Clean Unused Data removes unreferenced data, and Unlock Locks clears confirmed stale repository locks. Do not run a backup while performing maintenance.
Status Page
Status displays the repository overview, statistics, and task logs, and provides Backup Now and Quick check actions.
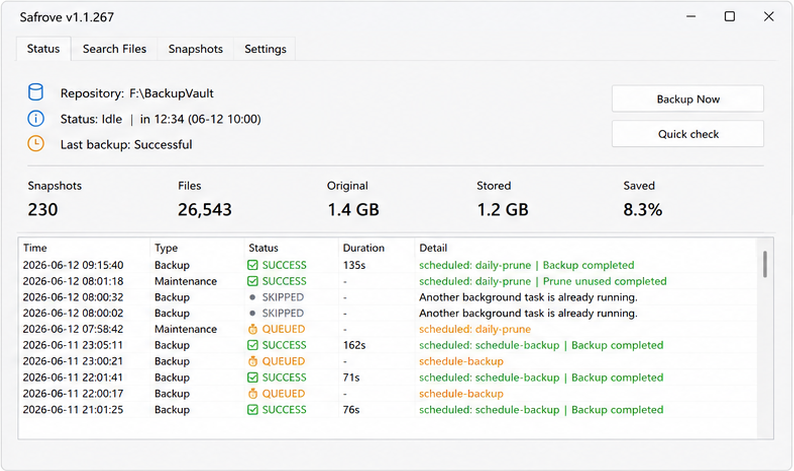
Shows the current repository path with a repository icon.
Status shows the current runtime state, such as Idle, Refreshing, or Running. Last backup shows the result of the most recent backup.
Snapshots is the total number of repository snapshots. Files is the number of files currently counted by the index.
Lists each task in reverse chronological order with its type, status, duration, and Detail. Failed or skipped tasks explain the reason here.
The logical size of indexed files before compression and deduplication.
The repository's actual stored size after compression and deduplication, including related repository data.
The estimated space-saving percentage derived from Original and Stored, mainly from deduplication and compression.
Checks repository metadata and index consistency without reading every data blob. It is suitable for routine checks but does not replace a full data-read verification.
Search Across Every Historical Version
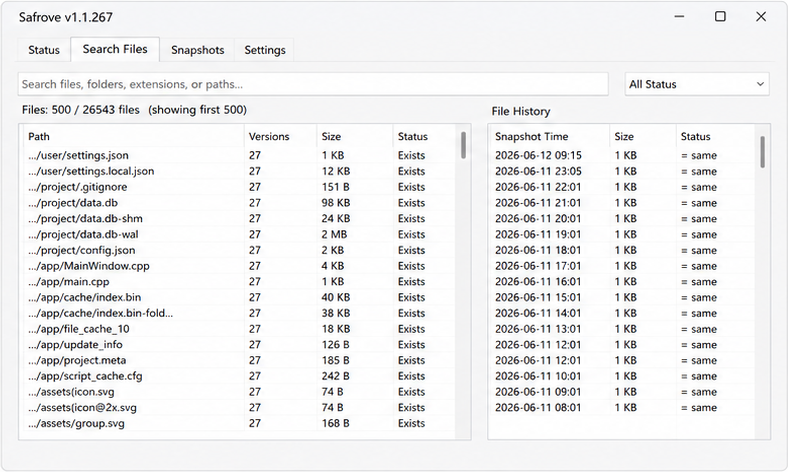
Search Files searches all indexed historical snapshots, not just the current folder or a single snapshot. Results first identify matching file paths; selecting a path then shows every indexed version of that file.
Matching rules and examples
- Normal input performs a case-insensitive substring match against the full path, treating “\” and “/” as the same separator. For example, report matches /work/Report.xlsx.
- Extensions and path fragments work too: .png finds paths containing .png, while project/settings matches files under a path containing that fragment.
- Queries containing * or ? use wildcards: * matches any number of characters and ? matches one character. For example, *.py matches Python files and report?.docx matches report1.docx.
- Use the status menu to filter Deleted, Changed, Stable, or Size anomaly results. At most the first 500 matches are displayed.
Using the two lists
Each row is one unique file path with Versions, latest size, and status. Results follow global index construction order, usually close to path order; they are not ranked by relevance.
After selecting a file on the left, the right side lists that path's versions across all snapshots, newest Snapshot Time first, with size and whether it matches the previous version.
Snapshot Timeline, Mount, and Unmount
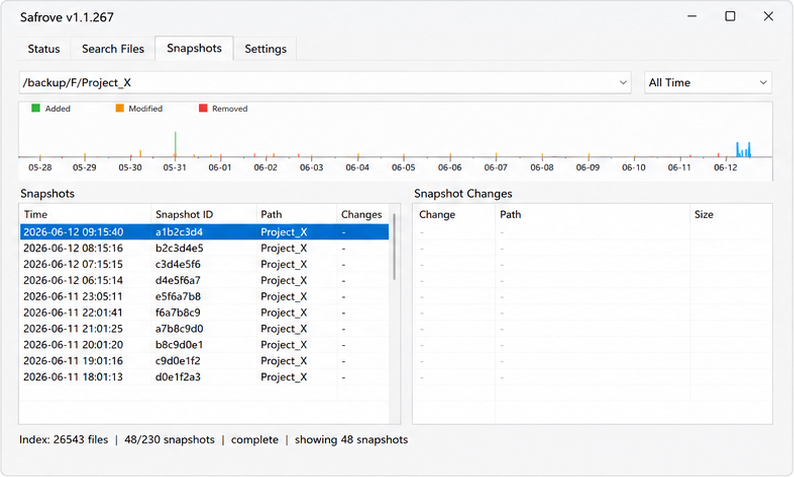
Snapshots lets you inspect changes by backup path and time, then mount any snapshot as a read-only Windows drive.
Choose a path and read the chart
- Choose the backup path from the upper-left dropdown, then select All Time or another range on the right. Only snapshots matching both filters are shown.
- The horizontal axis shows snapshot dates. Each stacked bar represents changes from the previous snapshot: green is Added, orange is Modified, and red is Removed. Taller bars mean more changed files.
- Click a bar or time point to select the corresponding snapshot below and refresh its change list.
The two tables below
Lists snapshots newest first with Time, Snapshot ID, Path, Changes, and Tags. Selecting one row chooses the historical point to inspect or mount.
Shows how the selected snapshot differs from the previous snapshot for the same path, including Added, Modified, Removed, file path, and size. The first snapshot may have no earlier point to compare.
Mount and unmount
- Select exactly one target snapshot in the left Snapshots table.
- Right-click it and choose Mount As Drive. You can also use the Mount button when visible. WinFsp must be installed.
- The read-only drive opens automatically after mounting. Use Open Mounted Drive from the tray menu to reopen it.
- Use Unmount on the page or in the tray menu. Mounting another snapshot stops the current mount first.
FAQ
What if a file is reported as in use?
If the error contains .safrove_write_in_progress, a previous backup or another process still holds the write lock. Confirm no backup tasks are running, then retry. Close and reopen the software if needed.
What if Backup Now reports insufficient license?
Open License... to check the status. If a machine ID mismatch is reported, re-activate using the current machine code.
What if search is still slow?
Enter a more specific filename or path fragment instead of a single common character. Building the initial index can take longer for large repositories; filtering is usually faster after indexing completes.
Can I recover data if I forget the Encryption Password?
No. The password encrypts the repository data, and the software cannot bypass it to read historical backups.